How to Make a Burning Bridges AI Video
Create a Burning Bridges AI video from a person, pet, or screenshot. Follow the upload steps, choose settings, check credits, and review your finished clip.
What you need before you start
You can make a Burning Bridges AI video with one reference image, an account, and enough credits for the selected settings. The homepage prepares the performance direction for you. You choose the image, aspect ratio, resolution, and clip length.
This workflow generates a new party scene. It does not edit an uploaded music video or guarantee frame-for-frame choreography. If you are looking for the original performance, start with our Burning Bridges meme guide.
- Use a PNG, JPEG, or WebP image up to 10 MB.
- Choose a person, pet, or character image with one clear main subject.
- Use images you have permission to upload and share.
- Have an editor ready if you want to add captions or music afterward.
Choose a photo or screenshot that gives the subject room
The input image is your most direct creative control. Look for clear subject details, even lighting, and enough surrounding space for movement. A very tight face crop gives the model less visual information about the rest of the subject.
| Image | A useful starting point | Check before uploading |
|---|---|---|
| Person | A clear photo showing the face and some of the upper body. | Avoid obscured features, heavy filters, or other people competing for attention. |
| Pet | A recognizable animal with visible markings and some body context. | Leave room around paws and ears. Animal motion may be reinterpreted. |
| Screenshot or character | A clean frame with one prominent character or subject. | Crop away menus, captions, borders, and unnecessary interface elements. |
A screenshot can work as an input image; it does not instruct the tool to reproduce the full scene or animation it came from. Stylized characters may change when interpreted in a photorealistic setting.
Upload your image and choose your video settings
- Open the Burning Bridges AI video generator and sign in. Selecting an image while signed out opens the sign-in flow.
- Upload your reference image or select an existing image from your library. This tool accepts one image at a time.
- Open the settings control beneath the image area. The current defaults are 9:16, 720p, and 12 seconds.
- Choose a format for your destination: 9:16 for a vertical post, 16:9 for a landscape edit, or another available ratio. Choose 480p or 720p and a duration from 5 to 15 seconds.
- Check the credit estimate before pressing Generate. Each new attempt is a separate generation request.
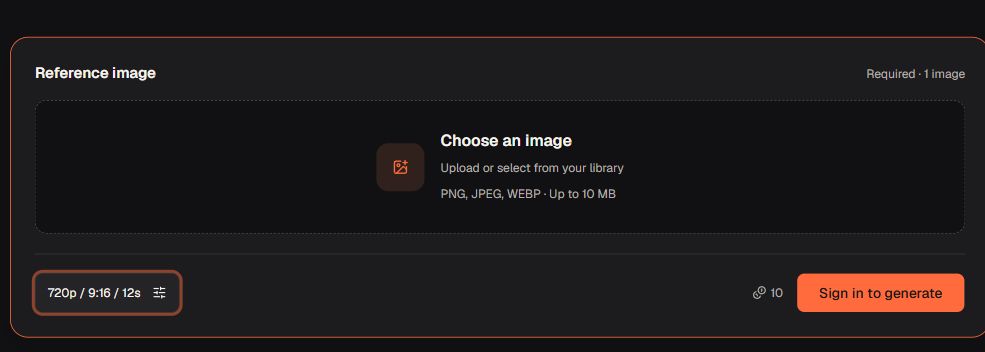
The duration control sets the length of your finished video, not how long generation will take. The prepared performance may be interpreted differently in a short clip; longer output still does not guarantee a particular gesture.
Check credits and allow time for generation
Use the public credit examples to compare supported settings, then confirm the estimate in the generator. The example table uses the same current pricing rules as the tool. Credit packs and subscriptions are listed on the pricing page.
There is no promise of unlimited free video generation. If free credits are available in your account, they must cover the request. Changing settings or trying a new image can change the cost of your next attempt.
Generation time depends on the service and request. Follow the status in your history. If a request is still running, check its status before starting another one; a second request is a separate attempt. We do not publish a fixed waiting time without an observed result to support it.
Review the full clip before downloading or sharing
Play the entire result in your generation history. The opening frame alone cannot tell you whether appearance, anatomy, or the background stays consistent during motion.
- Identity: check the face, clothing, fur markings, and accessories throughout the clip.
- Movement: watch hands, paws, and any moment where the subject turns or reaches toward the camera.
- Framing: check that the main subject remains visible and important details are not cut off.
- Background and audio: look for distracting changes, and listen to the downloaded result before adding another track.
Download the result you want to keep. The official Burning Bridges recording is not supplied by this tool. Add your chosen soundtrack or captions in your editor or posting app, using the options available to your account.
What to change when the result is not right
| Issue | Try next |
|---|---|
| Subject looks distorted | Start with a clearer image and fewer obstructions. Check that one subject dominates the frame. |
| Paws or hands change | Use a less tightly cropped image with more visible body context. Review the whole result; another attempt may still vary. |
| Important details are cropped | Try a source image with more space around the subject and select a more suitable aspect ratio. |
| Original dance is not repeated | This is new scene generation, not exact motion transfer. A new attempt cannot guarantee the original sequence. |
| Small screenshot stays soft | Find a clearer source. Choosing 720p cannot reliably restore details missing from the input. |
Change one input or setting at a time so you can judge what helped. Keep the results you like and avoid treating every new attempt as a guaranteed improvement.
Create your own party scene
Start with one image and review the settings before generating.
Open the video generator